What happens with SafetyNet protected devices is when you root your device (or modify anything in the /system partition) SafetyNet will send out a red flag in its API to other apps that your device has been modified. These apps then refuse to run on your Android system, or hide themselves altogether on the Play store. What you’ll need to do is systemlessly root your device using MagiskSU, but there are a few extra hurdles along the way if you’ve been adding modifications to your device for a long time. Short of performing a complete factory reset and/or flashing your device’s stock ROM, you’ll need to un-mod practically everything in your device. Here is the full guide:
Requirements
TWRP Recovery for your device Magisk Manager app Verified Boot Signer
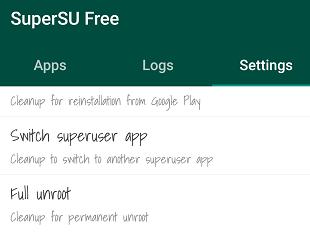
The first step is to completely unroot your device. So if you’re rooted with SuperSU (the most common root method), you’ll need to head into the SuperSU manager app and tap “Full Unroot”, then agree to your stock boot image being restored. However, do not agree to replacing your recovery image. You’ll also need to uninstall Xposed if it’s installed on your device, as well as un-modify pretty much anything you’ve done to your /system. This means boot animations, fonts, bloatware removal – if you’ve done a lot of modifications, you might as well flash a stock ROM and start with a completely fresh system. Once you’ve un-modified your entire device (or flashed a stock ROM), you’re ready to install Magisk. Grab the Magisk Manager app from Google Play, and launch the app. Now click the “Download” button and reboot into TWRP recovery when it’s done. Inside TWRP, click the Install button and find the Magisk .zip file that was downloaded to your phone. If you own a Google Nexus phone, you’ll need to tap “Add more zips” and choose the VerifiedBootSigner.zip file as well. Now swipe right to flash the .zip (or .zips) and Reboot System when it’s done.
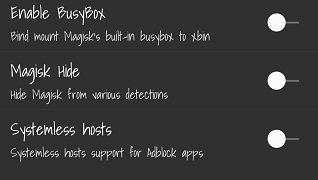
Once you’re inside your Android system, open the Magisk Manager app and go to the Settings menu. Now enable BusyBox, Magisk Hide, and Systemless hosts. Go back to the main menu and verify that tapping the SafetyNet button shows “SafetyNet Passed”.
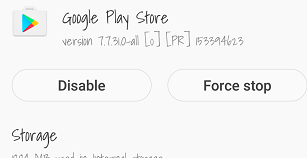
Now we need to clear the data for Google Play on your device – because there is a certification embedded that reports your device was previously rooted / modified. So just go to Settings > Apps > Google Play. Tap “Force Stop”, then go into Storage / Manage Space, and tap “Clear Data”. You should now be able to download and use the SafetyNet protected apps like Netflix and Pokemon Go, and your device is “rooted” in a sense of the word.
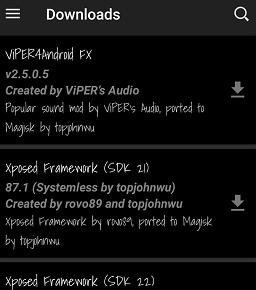
From now on you need to avoid installing any apps that modify the /system partition of your device, but luckily Magisk offers many systemless versions of those apps known as Magisk modules. There are modules for Xposed, Viper4Android, Dolby Atmos, Greenify, and many other apps. Just navigate into Magisk Manager app, click the “Downloads” menu, and download the app of your choice – most of them will download a .zip file to your SD card, and you will then need to flash the .zip in TWRP recovery.
How to Root Oppo F1s with SafetyNet BypassHow to Root Android in Systemless ModeHow to Pass SafetyNet on OnePlus 6 Android Pie Open BetaHow to Bypass Windows 11 Installation Requirements? Install Windows 11 on Any…