For example, you might flash TWRP + LOS ROM, and after formatting internal storage, you will receive the dreaded “Error 255”. After some testing with various XDA users, including flashing various TWRP versions and stock ROMs, it turns out that a potential solution involves downgrading to the official Nougat ROM, and using a custom .bat file to flash the phone. So if you are one of the people experiencing Moto Z2 Play booting directly to recovery, try this solution and report if it works for you in our comments.
Requirements:
Official stock Nougat ROM (November build)TWRP.Bat file flasherA text-editor like Notepad++
If you are on Oreo, a direct downgrade to Android Nougat may not be possible. You would need to format the entire phone via TWRP recovery, then boot to the bootloader and flash the stock ROM.
Another issue is that RSDlite (the flashing and unbricking tool for Motorola) typically does not work on Windows 10, if that is your OS.
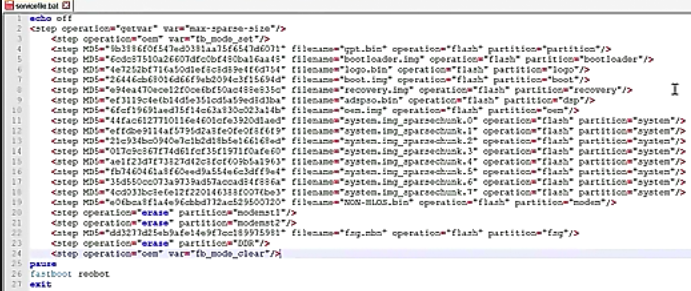
In any case, we need to convert servicefile.xml to servicefile.bat for a simple flashing.
So you should download the latest firmware for your Moto Z2 Play.
The firmware will come as a .zip file – you need to extract the servicefile.xml from the ZIP, and edit it in Notepad++.
Now create a new text document on your computer, and name it something like “servicefile.bat”, which will automatically create a batch file.
Now right-click this new batch file and edit it with Notepad+
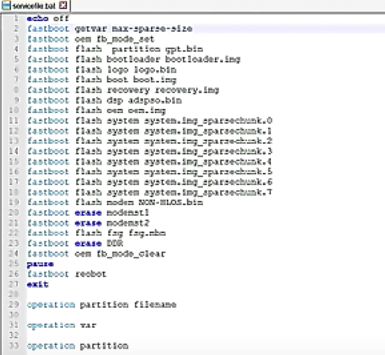
In this batch file, type the following lines at the top of the document:
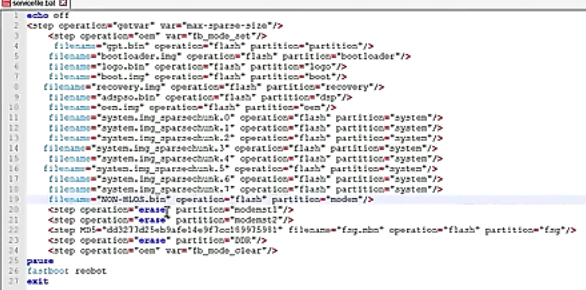
Save the file. Now go back to the original servicefile.xml and also open it in Notepad++
In the servicefile.xml you want to copy everything beginning from the line
Finally at the bottom of the .bat file, add these lines: Now you can save and close the .bat file. Now copy the servicefile.bat and also fastboot.exe, and adb.exe and the ADB .dll files from your ADB installation, and copy them into the extracted ROM folder. Launch ADB terminal on your PC, and make sure ADB connection is recognized by typing ‘adb devices’ Now you can go ahead and double-click the .bat file you created, and it will automatically flash the stock firmware onto your Moto Z2 Play via the ADB terminal. Flashing an entire firmware package may take a while, so we suggest going off and doing something while you wait – a few levels of Short Life should do the trick (because who doesn’t enjoy crawling towards a finish line on severed stumps?) Now you should be able to upgrade directly to the latest Oreo OTA, and it should no longer directly boot to recovery when custom recovery is installed.
FIX: HTC One M9 Boot LoopFIX: Samsung Phone Stuck in Boot Loop and Wont Turn OnRyzen 5 3600 Boot Loop after CPU UpgradeHow to Loop or Repeatedly Play a Video using VLC Player?